Cannabis grow room setup can be a very meaningful and often beneficial hobby for you. Successful indoor grow rooms are often a result of an extensive amount of planning, sweat, time, effort, and financial investment. However, the rewards are amazing, depending on how willing you are to work hard to achieve your goals.
Ideally, you want to create an optimal environment for cannabis crop to reap a potentially large, healthy, and robust yield. This indoor set up mostly in the form of grow room or grow tents must feature elements that are completely compatible with your plant of choice when gardening.
Choosing and designing the location for a grow tent, stealth grow box, or a large scale commercial marijuana grow room is the most challenging part. This is because there is a direct correlation between productive plant growth cycles, development, and harvesting with the quality of upkeep you put into each step of the growing process.
Simply put, the journey ahead may seem to be an overwhelming responsibility, but this can be a leisurely pursuit that will be fruitful in the long run.
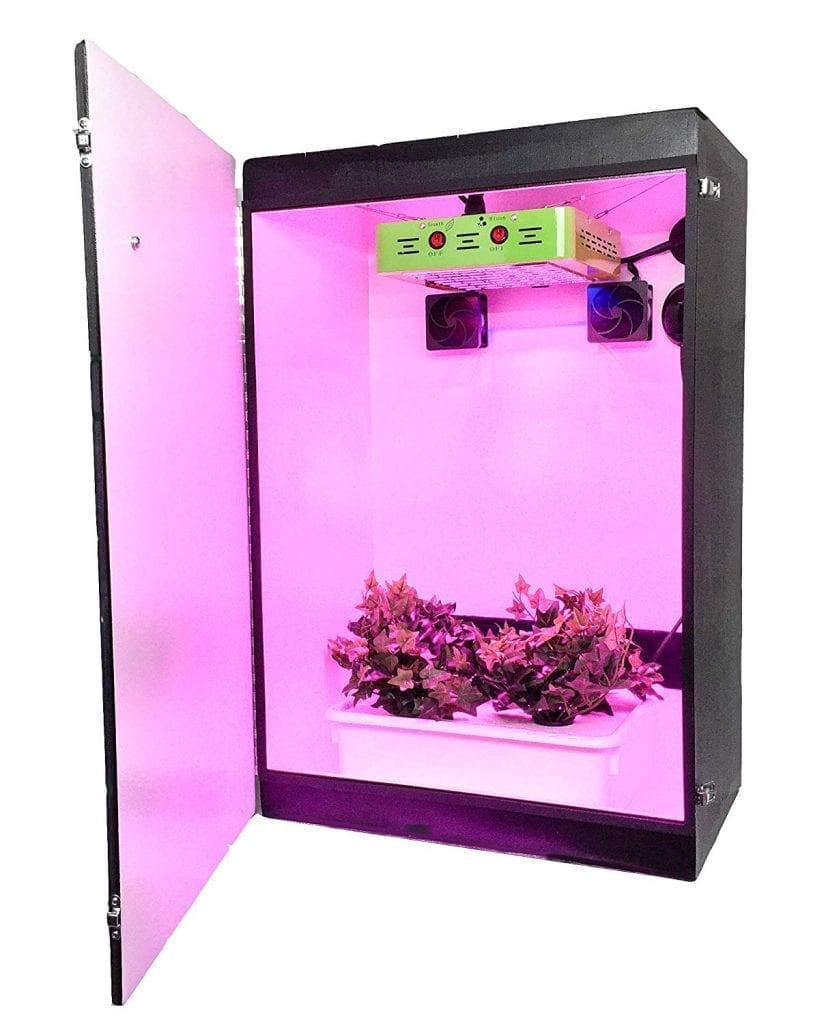
10 Best Stealth Grow Box
Setting up the Framework for a Rewarding Grow Room
There are, of course, certain prerequisites to take into consideration before starting with your grow room. To begin with, you must determine the best location for your Hydroponic or Soil Garden. Gardening should be a fun hobby, and similarly, your space should be convenient, easily accessible, clean, private, and able to support the system you aim to establish.
In this article, we’ve outlined in great detail, the method behind indoor small grow room that even a beginner can jumpstart. The reason is that growing indoors allows you almost complete power to influence each and every necessary input like a stable and odor-friendly environment. You can also transport and mix nutrients easily along with other variables for a beautiful yield.
However, there are specific requirements that you can under no circumstances overlook when you want to ensure high-quality, maximum yield, and potent harvest:
- Ventilation: Uninterrupted circulation and circumvention are important for an uncongested environment.
- Electricity: Not only do you need a sufficient, uninterrupted supply, you must also have proper wiring to prevent catastrophic events like short-circuiting and unexpected fire eruptions. Locate electrical outlets and make sure they’re placed in convenient locations.
- Air: Plant processes, including photosynthesis and respiration, require a robust supply of fresh, clean air, rich with Nitrogen, Oxygen, and Carbon Dioxide. For this, you need products like CO2 regulators, carbon filters, and inline fans.
- Water Supply: Without water, none of your plants will grow, and you don’t want to be lugging buckets of water back and forth.
- Temperature: Preferably establish a cool area maintained above a margin of 60F/15C.
- Wall structure: These aid in the refocusing and reflection of “lost” light back to the crop.
- Security Measures: You’ll want to avoid theft, unnecessary discovery, and maintain privacy, depending on the legality of marijuana in your region.
Selecting the Space for Your Grow Room
First and foremost, you must understand the necessity of a completely sealed off indoor area that usually has strategic artificial ventilation to build a foolproof growing space. You can get as creative as you can when it comes to choosing a location for your grow room. Some creative options can be closets, attics, basements, or any other hygienic empty space. For example, a spare room that you can 100% dedicate to your farming can get the job done.
Grow Rooms and Garages
A standalone room separated from the main housing can be a good option as you can also minimize possible risks of damage to plants and household members. However, most growers prefer garages as a good location for homegrown weed from a logistical point of you. A garage makes it easy for you to load and unload plant supplies, craft a controllable environment, and remain connected to your residential area. In addition, the wiring is easier than that of a spare bedroom or attic.
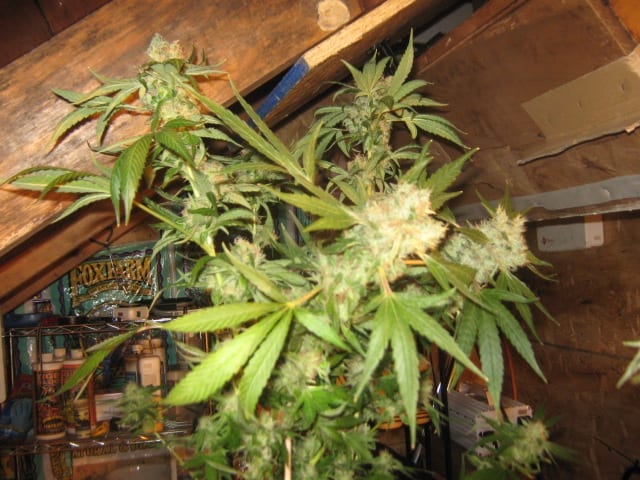
Attics
On the other hand, attics offer a secluded, well-insulated territory, where controlling the temperature becomes relatively easier throughout the year. This, in return, lowers the overall fixed costs required to pay for temperature control devices. As with every silver lining, there comes a dark cloud, and in the case of attics, it is common knowledge that heat buildup may become a concern if the ventilation system is not up to the mark.
Grow Tents
Grow tents are also one of the best alternatives to look into, and these fit in quite snugly in walk-in closets. These tend to be more self-contained, low-maintenance, and cost-effective. They also come equipped with ventilation ports and even support beams that will circulate the air within while hanging lights and filters is a breeze.
Safety Precautions
Finally, taking precautions like heavy-duty locks, security cameras, or even detectors can reduce the risk of break-ins. For additional protection, you can conceal the entrance to the room with large mirrors, full-length paintings, custom-fitted bookshelves, curtains, etc. Just keep in mind that any separate unit poses a higher chance of danger.
It is not recommended to choose rooms on the upper floor as natural sunlight can add a lot of heat, elevating the temperatures disproportionally and reducing your ability to regulate a stable base temperature. If the temperatures rise to 90F/32C or higher, the survival of your crop will be jeopardized.
Technical Specifications
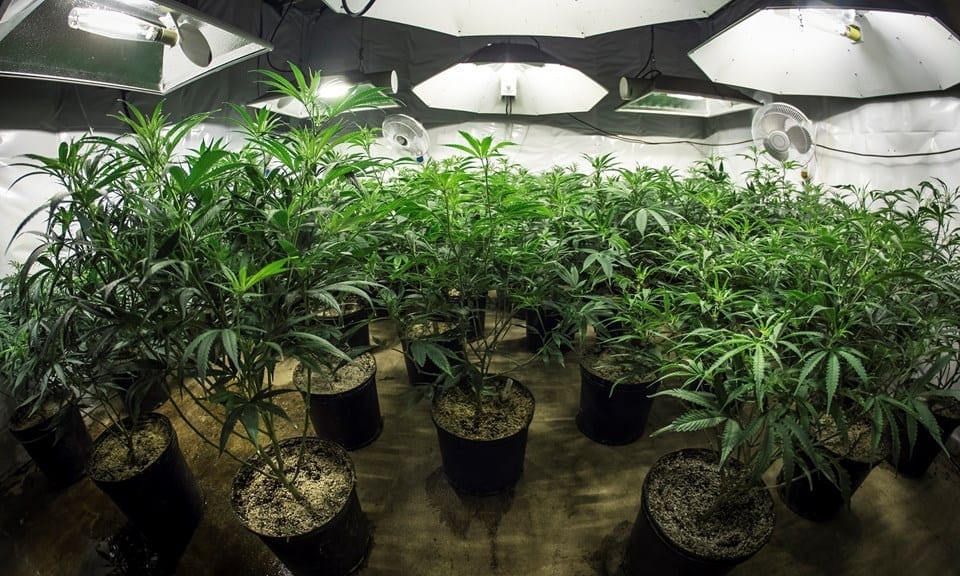
The layout of your plantation varies depending on multiple factors, including your target growth quantity. If your intentions are for large-scale, indoor marijuana yields, your best bet is to construct a light-proof, well-ventilated, and a secure grow room with dimensions of 14 x 24 x 9 feet. However, if you have a small-scale plantation, with moderately sized plants, then 15 – 20 sq ft, i.e., approximately 4 x 4 or 4 x 5 sq ft is a decent space size.
- Small tents, stealth boxes, cabinets: 2 x 4 feet or 3 x 3 feet for a yield of up to several ounces.
- Moderately sized grow rooms: Between 3 x 3 feet – 5 x 5 feet for a yield of up to several ounces till up to 2 lbs.
- Large-sized grow rooms: Larger than 5 x 5 feet for yields of 1-2 lbs or greater.
Prepping the Grow Room
Here you’ll want to be a little on the proactive side as a well-thought plan of action can help you avoid tons of mistakes, unnecessary costs, and reconstruction needs.
Draw Your Grow Room on Paper
To start with, try to draw up a schematic sketch of your perfect grow room. This blueprint must include a scale that accurately allocates placement of lights, vents, fans, pipes, equipment, electrical supplies, and the plants themselves. Make sure – this rough sketch must not overlook that your plants will double in size when they go from the vegetative to the flowering stage.
Decide About Flooring
Wooden or tile flooring are ideally preferred over carpeted floor plans as they are less likely to trap heat and host bacteria. Removing miscellaneous items is imperative to establishing sterile planting grounds, especially fabric materials, as these will hold dust, mold, mildew, and unwanted pests.
Sterilize
Afterward, you will be required to disinfect your room and clean to avoid susceptibility to fungal infections, diseases, and mold accumulation. You can sterilize the room with Lysol, bleach, industrial chemicals, or any strong germ killer that will completely cleanse it.

You can initiate this cleaning procedure by thoroughly scrubbing the walls, ceilings, and walls with your preferred chemical. Corners and holes are what you need to really cautious of, as these are nooks where infestations take root. To take it up a notch you might want to utilize a pesticide smoke bomb either as a precursory step or to deal with a pest problem.
These categorically prey on bugs, pests, larvae, eggs, algae, etc. You can purchase these from any hardware or online store and must carefully follow the manufacturer instructions to ensure effective and safe outcomes. After using them, you will have to sterilize the space one more time.
A sterile, clean, and germ-free environment is your ticket to success in the long-run. Your outlook should be along the lines that any external body or item entering into your grow room is a vessel carrying innumerable threats to your crop. As such biweekly cleaning is a must. So if you’re entering the area after interacting with houseplants, you’re more likely to carry in spider mites
Also, keep your plants barricaded and away from domestic pets as these ordinarily act as vectors for the transmission of bugs and bacteria that will hurt your vegetation.
Choosing a Growing Medium
There are two main types of growing mediums, i.e., Hydro or Soil, each of which follows varying systems, technologies, and mechanisms.
Hydroponic Systems
If you want to look into a quick and efficient cannabis growing process, then this is a good candidate. However, the method is preferred for experienced growers as it is rated mostly as sensitive systems. Even though making mistakes is natural, the tiniest one here can lead to devastating consequences.
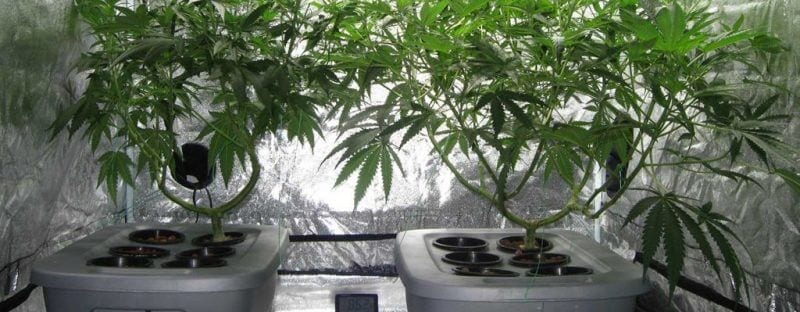
But, if problems are identified early enough, the solution is draining and replenishing the reservoir. Even though these occupy less space, they’re expensive and more complicated for beginners.
This soil-less medium makes use of coco-coir, expanded clay, rock wool, etc. all of which allow more breathing space for your plants and are lighter. Unlike soil, these are nutrient deficient and require manual insertion of nutrient deposits that your plants cannot thrive without. You won’t need to transplant your seedlings after vegetation and still harvest bigger yields with better quality buds.
Soil Systems
Horticulture experts and novices both will appreciate this traditional farming method. Not only are the raw materials widely available, but they are also cheap as dirt, literally.
Nourish Your Plants with Appropriate Nutrients
The key to growing excellent marijuana buds is the inclusion of essential nutrients and fertilizers into their daily intake. As such, try to include the following macronutrients or primary nutrients:
- Nitrogen
- Potassium
- Magnesium
- Phosphorus
- Sulfur
Although not required in a substantial dosage, the following nutrients should also be delivered:
- Manganese
- Cobalt
- Copper
- Iron
- Zinc
- Boron
- Silicon
- Chlorine
It is integral that you accurately measure them on a daily basis and customize dosages accordingly. As you are catering to living organisms with complex biochemical makeups that are constantly evolving, make sure you have a constant eye on everything happening. Nitrogen toxicity and burning is a common error that you need to be wary off in case the calculation is off.
Ventilate Your Grow Room Properly
If you want to prevent the formation of molds and mustiness, the grow room or space must be well-ventilated. This is why your designated farming area must be efficient in circulating uncontaminated air. Furthermore, an effective ventilation system regulates humidity control and minimizes heat from amassing to dangerous levels. Overall your crops will experience a reduced amount of environmental stress and exposure to pathogenic infection.
At a small scale, fans are a good idea as they will help you cool down your space. Also, they will help you in air circulation within the room. This is a consistent tool that will continuously, evenly distribute CO2 and temperatures within the grow area. Since this is a cyclical process, you’ll need some escape mechanism to get rid of hot, humid air. You can attach Panda Paper to slightly open doors or windows to maintain climate control and prevent leakage.
As a rough estimate, the benchmark for adequate ventilating systems is one that can easily exhaust one room within a minute. In the absence of air conditioning or warmer climates, external exhaust ducts can come in handy.
Many modern gadgets can help you accomplish your ventilation goals, including multiple air ducts, ozone generators, circulation fans, etc.
Humidity Regulation
In each growth phase, your plants need varying humidity levels. The easiest way to achieve this in a small scale grow room setup is to spray water all over the inside, automatically raising humidity levels.
Equipment
Often taken for granted, containers and pots are an important part of the growing process. As the foundational home for your weed, you might want to spend a little time picking the right ones.
Firstly, look for containers that allow for water drainage at the bottom. Space within the pot is also a common oversight, try to be as generous as you can as restricted spaces lead to mutated and stunted growth. The more space you provide, the larger the roots, the larger the plants, and the larger the final harvest. There are a variety of models that you can look through ranging from 5, 15 to 25-gallon buckets.
Noise Reduction Products
Marijuana growth requires an effort, so you need additional support from modern products like exhaust fans, oscillating fans, ballast devices, and more. However, these tools also create noise, sometimes loud and uncomfortable outside the grow room setup. To counter this, you need sound-proofing insulation within the walls, like carbon filters to drive out any rampant odors, soundboards, odor neutralizers, air purifiers, etc.
An alternative strategy to minimize such unpleasant peeves is to vent your extractor in a communal area. Not only will this remove heat from the lamps placed inside, but it’ll also stabilize indoor temperatures and extract pungent odors successfully. Another idea is the partition of one section, and then to make use of this smaller area as a control room for your intake environmental equipment, heating, and cooling units.
Effectively Light Proofing the Room
Since this is neither a greenhouse nor an outdoor operation, you have to artificially simulate sunlight in specific ranges according to the respective season. It is very important to understand how Light Proofing plays a critical role in the Plant Life Cycle.
For a seedling, they require a proportionally higher exposure to light. However, as the season progresses, sunlight exposure decreases, which is the stimulant that will trigger your plant to start the flowering stage.
Your aim must be to elimination natural light as this interrupts the system in your grow room, reduces your overall yields and may even prompt the development of plant hermies that’ll undesirably pollinate females, leading to a disastrous ending.
This is exactly why it is completely normal for pre-flowering marijuana plants to be placed in 12 continuous hours of darkness and then 12 nonstop hours of lighting. This will imitate the arrival of the winter season and lead to peak bloom. The special light-proof tape is readily available in the market to cover up holes, cracks, and crevices through which light can seep through.
Airtight Containment
During the blooming and budding stage, the development of smell progresses quite a lot. You will notice that the area begins emitting a fragrant but powerful odor, making it imperative for you to ensure that your grow room is airtight.
Additionally, airtight containment spaces offer protection from harmful variables ranging from vermin, bad climate, pollution, and other possible disrupters. Your goal should be to replicate a quarantined containment cell, which may sound extreme but is a prerequisite for vigorous improvement in your produce.
Preparing your Grow Room Sections
Grow room sections are the mark of a productive marijuana grower. These sections are cordoned off, with one region dedicated for vegetative growth and cloning, while the other is solely for flowering purposes. Owing to the varying needs of each phase, these two zones differ from each other with regards to how and why they are set up.
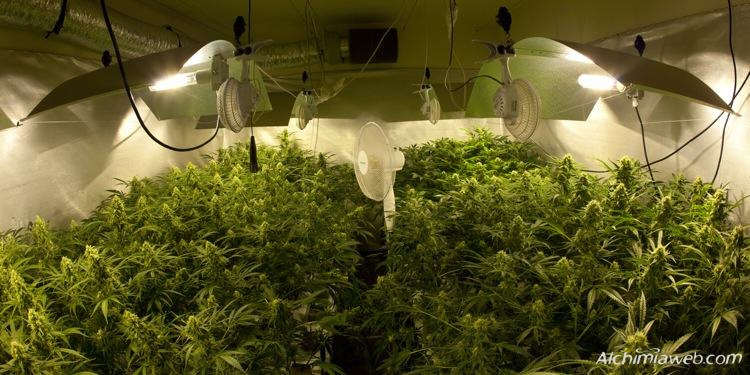
The vegetative area, for example, will make use of a cloning hardware device that’ll allow seeds and clones to grow. You can equip the area with 48-inch fluorescent tubes that can operate 24/7.
The flowering area, however, requires the use of a hydroponic garden setup with HPS and MF fixtures that should be left turned on for 12 hours a day.
By adopting the partitioning technique, you can create a seamlessly integrated flow of plants moving in and out of each zone. Within the hydroponic arrangement, flowering plants flitter throw their own developmental processes, whereas, in the clone arrangement, the germinated seeds and clones continue to develop.
Here’s where you see the real advantage; Post-harvesting plants from the vegetative area are immediately free to be shifted into the flowering zone.
Top 6 Best 3×3 Grow Tent Reviews
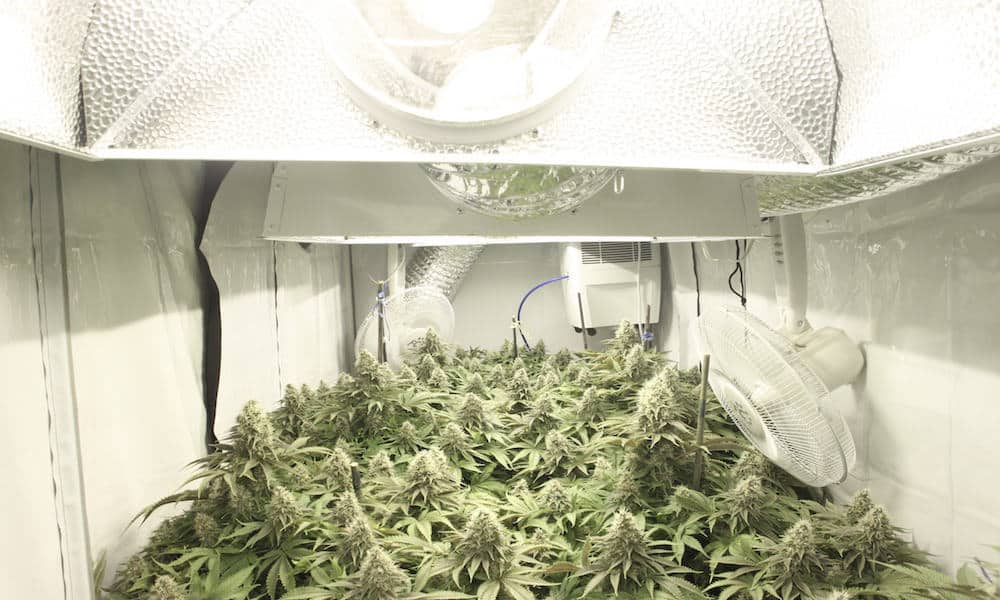
Light Up Your Grow Room
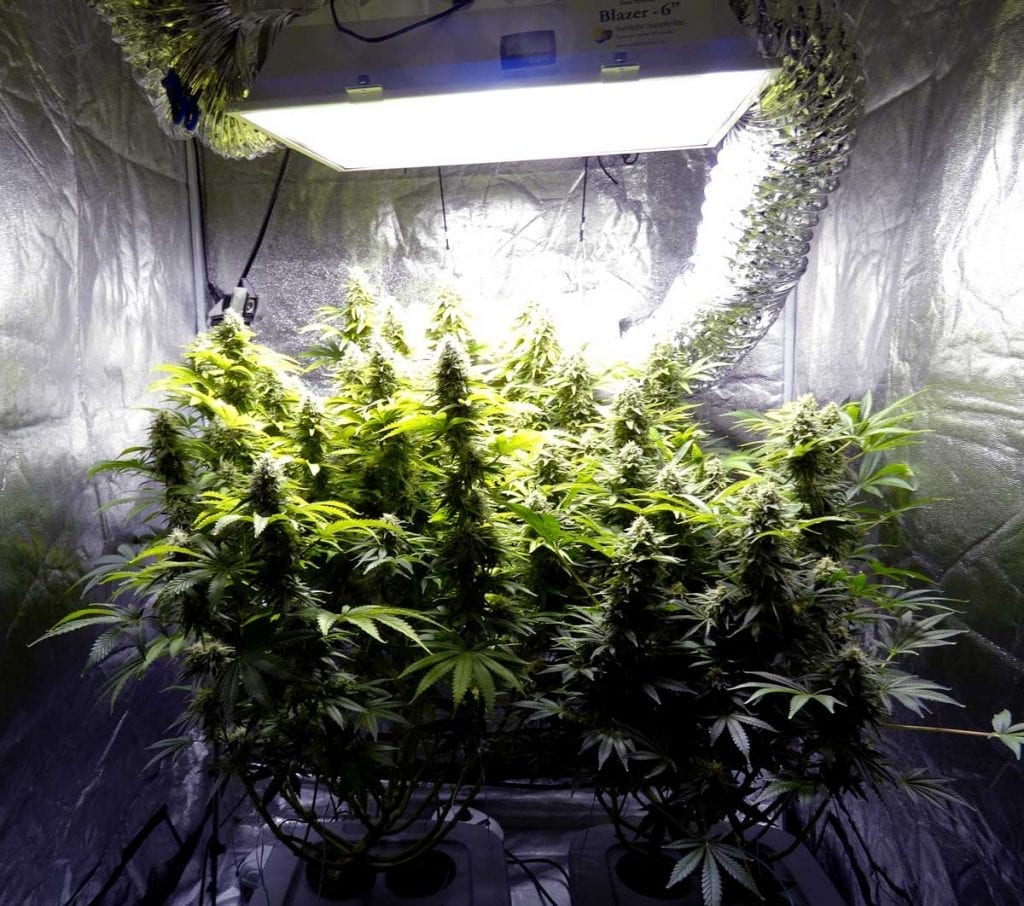
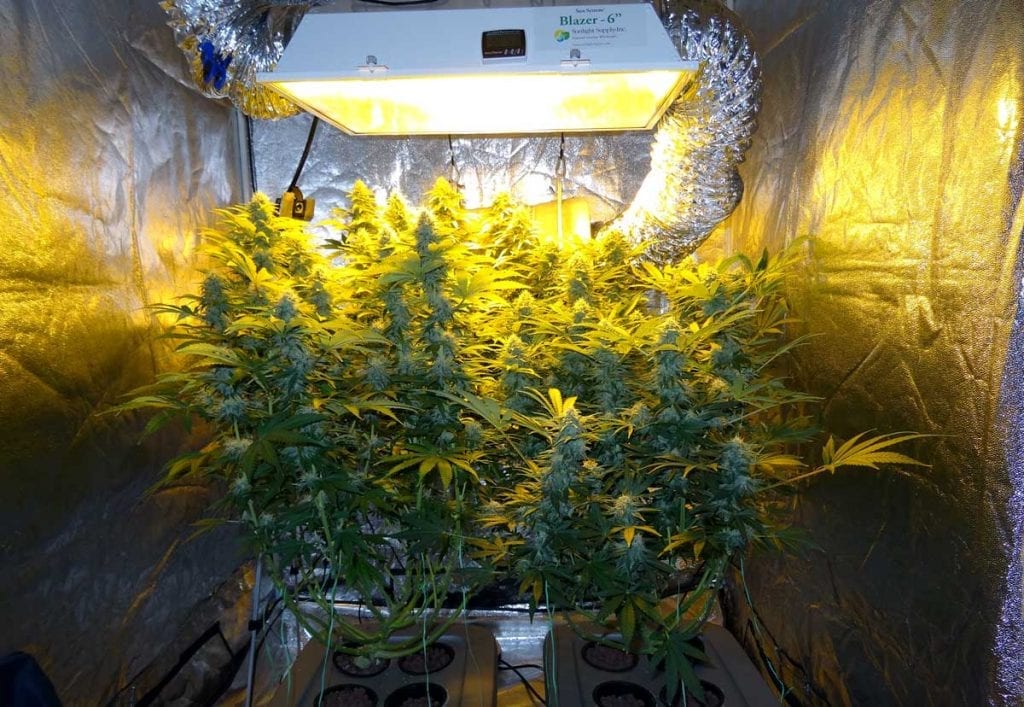
Since lighting is imperative to plant processes, cannabis growers usually look into LED, Fluorescent, and High-Intensity Discharge types that can be metal halides or high-pressure sodium. For the vegetative phase, 400W prove to be sufficient, whereas for the flowering phase a 600W HPS lamp for every square meter will do just fine. Ideally 33W/ sq. ft would be great for your indoor grow room.
Distance from Plants
These lights should be attached at least one foot from the ceiling. Depending on the wattage and type of light, you can hang them at a distance of at least 8 inches to 31 inches from the plants. For example, 150W lights can be kept at an 8 inches distance while 1000W at 31 inches.
Popular Options
At present, LEDs have become the preferred lighting gadget owing to its benefits. HPS Fluorescent lighting run quite hot in comparison to LEDs in a grow room setup, which is why you’ll have to spend a little more on additional fans to prevent overheating and healthy heat dissipation.
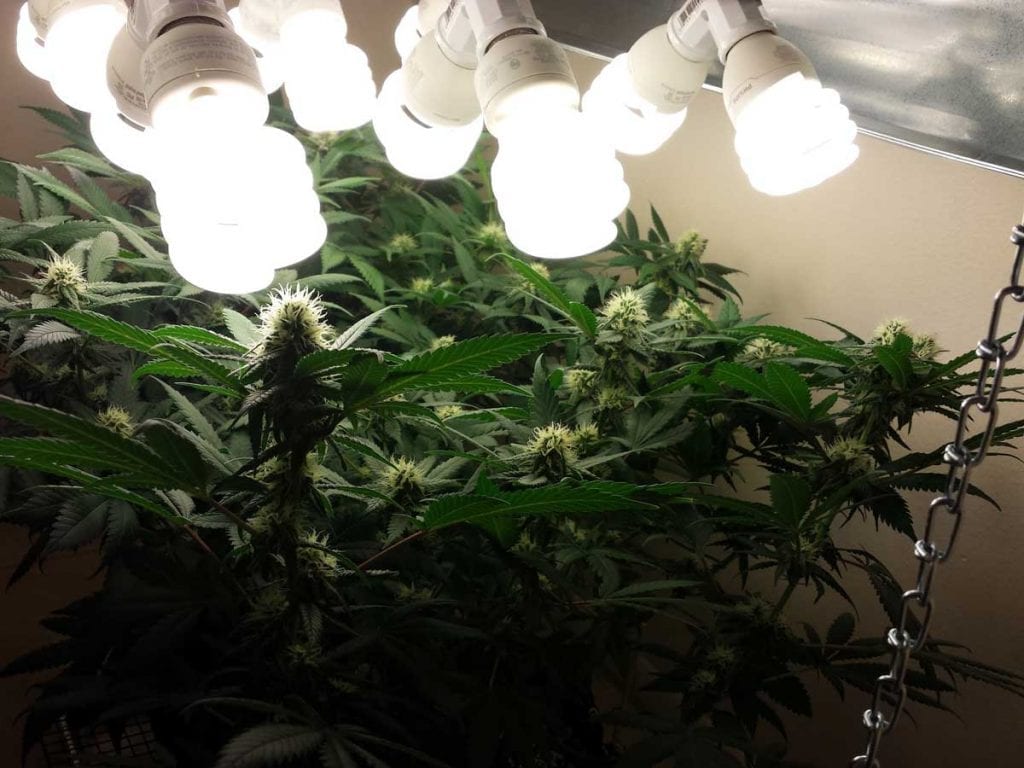
CFLs
Research has proven that small-scale growers on a tight budget can benefit from compact fluorescent lights such as CFLs or T-5s. This is because these economic products come equipped with bulbs, reflectors, and ballasts. These are also categorized as energy-efficient while still providing the perfect light spectrum. Moreover, they release minimal amounts of heat, placed at lower heights yet with higher canopy penetration abilities that ensure light reaches the bottom too.
Fluorescents
Fluorescents are also an affordable lighting system option, capable of generating 25% to 35% less light of electricity used per watt. This is less efficient than those that we mentioned earlier, but not disappointing enough to kick them out of the list of potential lighting candidates.
Out of all of these, LEDs are a sure shot purchase for smaller harvests of 1-2 oz, with a yield of 0.5 g/W. These are available in a multitude of options and brands so you’ll have to take a moment before really diving in.
HID Lights
Lastly, HID lights are known to generate considerably higher temperatures than all of the above. Not only are they less efficient, for growers lacking the tools to control heat, but they can also lead to dangerous fire hazard consequences. The only upside they present is the low upfront payment.
Secure Installation
Regardless of whichever light option you decide to install, make sure that all the electrical parts are securely protected, insulation protected, and secure from causing damage or being damaged themselves. In a farming operation, one of the first things to ignite problems is growers being exposed to faulty or naked wires when they are watering their plants.
Use Light Rails
Plants thrive off of sources of illumination, which is why incorporating a significant number of suspended ceiling light fixtures can lead to robust development. On the other hand, Light Rails are designed as a light mover suspended from the ceiling, lights hang down from it, and the rail itself rotates lights in circular motions and patterns over the allotted plant zone. This a smart technique to disperse more lights with fewer actual lights.
However, we recommend you to pair them with 1000W or 600W light because a 400W or 250W fixture will under-light a 6 ft zone. Adjustable chains are a helpful supplementary tool that offers you the flexibility to adjust lighting according to their needs.
Earlier, we mentioned the dual plantation system of partitioning the vegetative and flowering plants. This strategy will put your mind at ease when it comes to electrical costs. Electricity use is minimized by a 25% – 35% amount as MH or HPS lights will only be working for 12 hours per day.
In this situation, however, do not forget that flowering plants require complete darkness in the dark phase, whereas the vegetative plants still need light. To create an isolated setup, thick, black, and light-proof blankets or curtains are effective. You can also just create partitions that are at a significant distance from each other.
Flooring Layout
As a grow room requires daily watering, it may cause flooding at times. This may be due to broken pots that leak, or water released from plants themselves during transpiration. As such, a preventive method is to install waterproof flooring that can withstand a significant amount of wetness. As always there are cheaper substitutes you can buy. These may include plastic drop sheets that you can spread out throughout the room. These are readily available in most grocery, hardware, and online stores.
It’s always better to be safe than sorry. Adopting preventative strategies rather than reactive strategies is the best way to maintain consistent growth. As such, you should place trays underneath your marijuana pots to catch excessive runoff water. Cinderblocks and bricks with wood elevate your plants further up to minimize contact with runoff water. It would also be productive if you mopped as frequently as possible.
Adequate Management of Internal Climate of Grow Room Setup
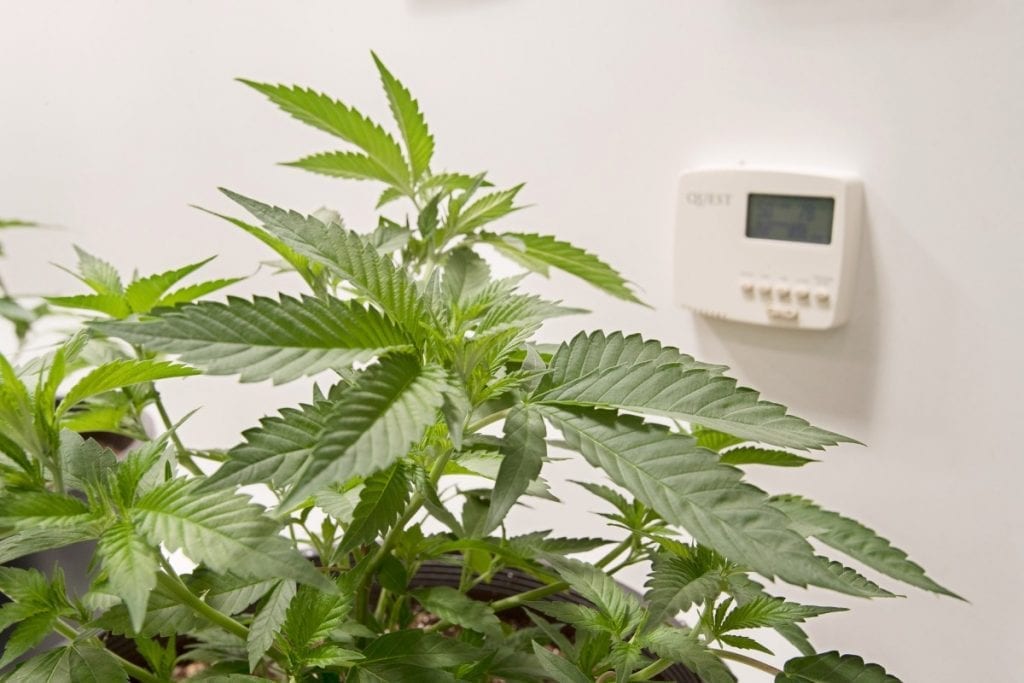
Three essential components directly affect the growth and development of your cannabis cultivation. These include CO2, temperature, and humidity. To regulate these elements, there are plenty of available tools you can buy:
Its true you can’t control mother nature. However, you can manipulate the temperature, humidity, and moisture levels within your grow tent or room. The optimal temperature range is 65 to 80F (18C to 26C) in a grow room setup. With each growing phases, these requirements will fluctuate. For example, young plants such as seedlings and cuttings (clones) prefer high levels of humidity.
At the end of the day, installing temperature controlling ventilators will promote plant thickness and stem strength. If you have a slightly more flexible budget, you can invest in a thermostat, hygrostat, or thermo-hygrostat.
By hooking up the thermometer to an exhaust ventilator, you can adjust the heat according to your wishes. Plus, the addition of a dimmer switch can easily allow for the regulation of speed at which the ventilator operates. This grants you the freedom to run it on a continuous loop of slow speed to pump fresh air in.
Controlling the Levels of Air Moisture
Air humidifiers are the best way to control air moisture within your horticulture setup. Frankly, they’re a lifetime investment that won’t be too heavy on your wallets. Moreover, they’re often accompanied by a pre-included, built-in hygrostat.
This essentially means that you only have to enter the desired air moisture concentration, and the humidifier does the rest. This is especially beneficial during the growing period. Such external stimuli garner a large amount of influence over whether the produce will be prosperous or a complete disaster. If you’re looking to accelerate the growing period phase, then humidifiers are your answer as they double the growth rate.
As established earlier, wholesome insulation is mandatory. However, there are holes on the bottom of the space to allow the free flow of new CO2 rich air. Also attach a suction pump parallel to this, to suck up and remove warm air that rises. The nature of air movement determines the placement of the suction pump. By attaching a carbon filter into this pump, you can remove unwanted odors without any extra exertion on your part.
These air input holes and top air exhausts craft an air stream that transmits fresh air out through the plant. As a result, it replenishes the entire organism as it travels up. This ensures the plants get unrefined and pure air.
What to Look for When Buying Filters?
It is common knowledge that filters have a lifespan of up to 5 harvests or year-long use. The pump attachment should also be compatible with the size of your grow room. So, to calculate the appropriate capacity for the grow space, you need to calculate the volume of the space. Always get a pump with a slightly larger capacity than the actual volume of your growing zone.
You may not feel the effects in an obvious way. But, during the summers, it will regulate normal indoor temperatures. The earlier advice is to put into use during the winter seasons when these pumps are functional but run gently. Therefore, they consume a profoundly small amount of electricity. In comparison, during the summer months, you can extend the throttle outwards slightly at an angle. You can do this while keeping the temperature at or below 30 degrees. Nylon stocking placed over the room guarantee that no harmful substance enter the cannabis grow room.
Interestingly, a small ventilator operating flat out is far noisier than a large ventilator running at half the speed. We recommend that you attach a PVC tube with a bend. They’re suitable air moisture regulators without letting any natural light the tiptoe inside.
Add a Collection Rack for Better Results and Organization
Do not clutter low budget and small scale grow setups. This will negatively impact efficiency and productivity levels. To capture the essence of synergy between the space and you, you need to keep things tidy a bit. This is where collection racks become truly useful.
The benefit is undoing disease foothold and developing a relatively safe growth location. This rack captures any annoying dead foliage, leaves, and water runoff the moment they bring to fall or leak. This loose maintenance technique means you don’t have to break a sweat as post-harvest, you can simply dump the trash.
These racks also act as assistants to the flushing process. Here, it extracts the excess fertilizers and nutrients from the medium in which you are growing your marijuana plant. Once you flood the plant with large amounts of pure water, all residue from over-fertilizing will wash out. Flushing every two weeks is the recommended practice.
This multipurpose tool doesn’t just stop there with providing operational advantages, but you can also use it as a container. It holds feed water where plants can reside and suck in all necessary nutrients. You can avoid over-fertilizing by doing this as plants dictate which, when, and how many nutrients they need to absorb. It also doubles as an automatic watering system. This is useful for when you need to travel away from your grow room for an extended period. With advanced stages, you can evolve into using the ebb and flow hydro systems.
Making Room for Reflective Materials for Your Cannabis Plants
Ceilings, walls, and floors act as the platform where light reflects to help out with your plant. Reflective material placement is like fuel for plants to trigger vigorous growth. You can accomplish this feat either with Mylar or painting the location a flat white. Mylar at the moment is the cheapest and most popular option in the market. Reflecting around 99% of light, it justifiably is pricier than black-white plastic. However, you just need to hang it as straight as possible in your grow room setup.
Installing reflective material can multiply and augment the amount of usable light by up to 30% for your cannabis plants. The best way to place reflective martial is by making sure that it stays flat. This is because a deformity such as a wrinkle or a crease can disrupt the reflection of the lift. Sharp edges can hold onto the light, so it’s better to opt for soft round edges. Place the reflective surface on a smooth frame, for which Velcro tape can be a good option.
At present, the market has an abundance of reflective material types, as listed below.
Foylon
Reinforced by foil laminate at its core, this is made of spun polyester fabric. With durable and low maintenance traits, it is relatively costlier than Mylar. It easily reflects off around 95% of light and 90% of heat. This Superman material is resistant to most solutions, and hence, you shouldn’t expect it to tear or fade readily. The maintenance requirements are simply wiping or washing it.
Flat White Paint
Comparatively less skilled at reflection, they reflect 75% – 85% of light, without hotspot creations and with low speeds. You must understand the difference between flat white and other whites like eggshell, gloss, and plain ones. 55%-60% is the maximum reflection talent semi-gloss boasts of. Also be very careful of smears, blots, or painting accidents that can lead to reduced reflection. Titanium white is also very reflective, which is why it’s perfect for reflectors.
Elastomers Paint
This rubberized roofing paint ensures 90% reflecting results, and high mildew resistance.
Mylar
Multitasking as a light reflector and moisture barrier, this polyester film is good at reflecting 85% of radiation light. It is available in metalized, black, white, dimpled metalized and threaded aluminized. On its own, it can withstand an impressive maximum temperature of 392F/200C. Furthermore, it is fire retardant and electrically resistant.
Poly White Black Plastics
Tough, reflective, easy to clean and temporary in nature, white plastic is the perfect reflector. It is 95% more reflective vs. a six mil thick black side for the darkened side of the partitioned technique. Tape glue, carpenters nails or other hanging tools can set this up effortlessly.
Styrofoam
Approximately 75-85% reflective, these are perfect for harsher environments like attics and even act as insulators preventing unstable temperatures.
Installing an Essential Watering Unit
Without water, you cannot hope to grow anything. Therefore, a 150l sealed (evaporating-proof) water container should be available at all times. You can sprinkle this water over the plants via a hose and attached spray nozzle. Adding a circulation pump will concoct a useful mix of water and nutrient-filled solutions. In addition, a breaker head will oxygenate the water before delivering it to your crops.
You should also consider adding on a heating gadget. It will stabilize the water temperature at a constant approximate of about 73.4F/32C.
6 Best 10×10 Grow Tent Reviews
Finally Planting
All in all, you have to go through the detailed procedure of the basic setup requirement. This includes installing lights properly and testing the climate. Next, it’s time to place in your plants. This means either setting up your hydroponic system or putting them in your smart pots.
We hope after reading our detailed tutorial, you now don’t have any ambiguities about the grow room set up. We are sure we have answered all your curiosity-driven questions in this article. If followed precisely, your Marijuana Grow Room will accomplish profound levels of achievement. It will grant you feelings of fulfillment and pride if you follow the tips and tricks we’ve compiled.
Table of contents